1. In the ground or set in concrete
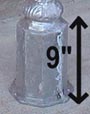
Back in the horse and buggy days, all hitches were buried in the ground or set in concrete right at the curb. Our horse hitches have a 9" high hollow base that
is designed to be installed just like the originals(and they won't rust like the old iron ones!).
Just dig a hole and plant your hitch or set the hitch into concrete. You can also add some small landscaping details like bricks around the base of the hitching post.
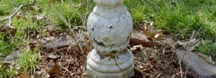 ABOVE LEFT: Hitching post base detail, ABOVE RIGHT: Old iron hitch buried with brick trim around
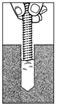
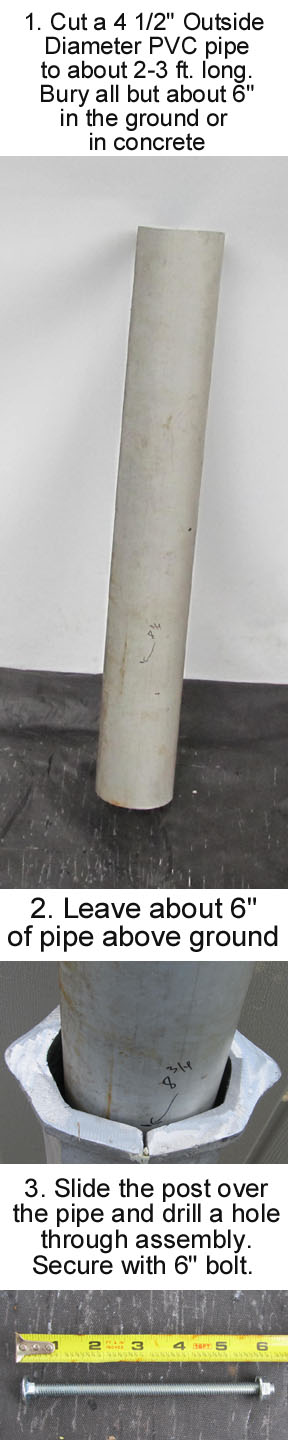 Another traditional method of post installation is to bury a 4 1/2" outside diameter PVC pipe into the ground or concrete(leave about 6" sticking out), then slide the hollow
base section of the post over the pipe like a sleeve, then drill a hole through the post base and PVC pipe and insert a 6-inch carriage bolt and nut to secure.
Another traditional method of post installation is to bury a 4 1/2" outside diameter PVC pipe into the ground or concrete(leave about 6" sticking out), then slide the hollow
base section of the post over the pipe like a sleeve, then drill a hole through the post base and PVC pipe and insert a 6-inch carriage bolt and nut to secure.
2. On concrete paver or slab with epoxy paste
This is the most common, fastest, and easiest permanent installation method to securely install a hitch on any concrete surface -
an epoxy paste installation kit and these instructions are included with each hitch. If you want to be able to move the hitch, you can attach the post to
a round or square shaped 2" thick paver up to 24" x 24" in size. Or you can just epoxy the hitch directly to your concrete patio, stoop or driveway.
Remember, once installed with epoxy, it will take a grinder and a lot of work to remove the hitching post.
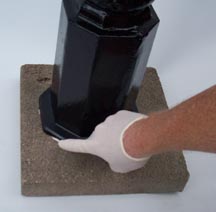
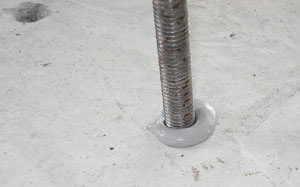
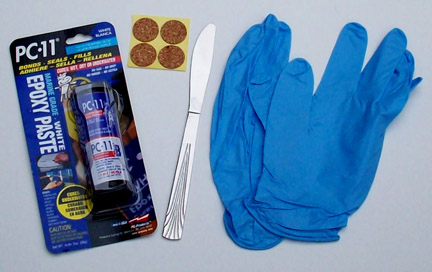 ABOVE: Epoxy paste installation kit included with every hitch
The epoxy paste kit includes: 2-part epoxy paste, mixing knife, 4 spacers, and a pair of rubber gloves. The first step is to
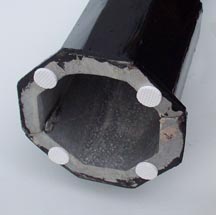
stick the 4 self-adhesive spacers on the bottom 1" lip of your hitch- this will lift the hitch up just enough to allow the epoxy to set underneath.
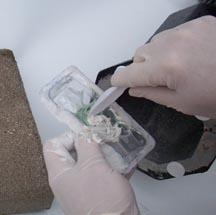
Next put on the gloves and open both the gray and black ends of the epoxy cylinder and mix ALL of the two pastes together in the plastic packaging provided using the metal mixing knife(1:1 mixture).
You should end up with about a golf ball size glob of mixed epoxy paste. You have about 30 minutes until the mix starts to harden. Use your fingers
to smudge and work the paste around the base lip evenly between the spacers- it doesn't have to be exact. Finally set the hitch on the concrete surface. If some paste squirts out the sides
you can wipe it off. Allow the epoxy to cure for 24 hours and you are all done!
 ABOVE LEFT: Stick on spacers, ABOVE RIGHT: Mix 2 parts of epoxy paste

 ABOVE LEFT: Randomly smudge paste between spacers with fingers
ABOVE RIGHT: Set on concrete and remove excess paste
3. On wood or concrete with mechanical attachments
You can bolt the hitching post to wood or concrete to allow for later removal(2 or 4 bolts will work).
First get 5/16" or 3/8" diameter bolts and matching nuts at any hardware store(typical 3" long bolts shown).
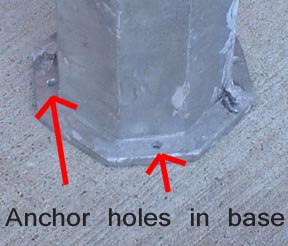
Then drill 1/2" holes in the base(2 or 4 holes). Set post on floor location and mark where holes are.
Next drill holes through the wood or into the masonry floor. For masonry, blow debris out
of hole, fill hole with epoxy, insert end of bolt into hole, and wipe off excess epoxy. Slide on hitching post before epoxy sets
to make sure bolts are lined up correctly, let epoxy harden, then secure the post with nuts.
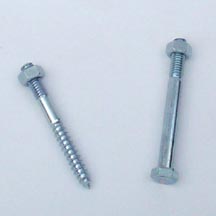
 ABOVE LEFT: Sample bolts that can be used for masonry/wood(screw-head: left) or wood(hex-head: right)
ABOVE RIGHT: Drill (2) or (4) 1/2" diameter holes into post base and mark hole spots on floor

 For installation on a 1-2" thick wood deck:
Just insert hex-head bolts from underneath or screw-head bolts from on top and secure hitch with nuts
For concrete floor installation:
ABOVE LEFT: Drill hole in concrete with masonry bit and blow out debris
ABOVE CENTER: Fill hole with epoxy paste and insert screw-head bolt
ABOVE RIGHT: Final view before wiping off excess paste and sliding on hitching post
RELATED LINKS
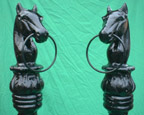
CLICK HERE to order a UNPAINTED horsehead hitching post.
CLICK HERE to order a CLASSIC BLACK horsehead hitching post.
CLICK HERE to order a CUSTOM PAINTED horsehead hitching post.
CLICK HERE to order a LAWN JOCKEY hitching post.